m |
m |
EDITOR'S NOTE—This equipment is particularly suited for science class-room
demonstrations. At no time should a demonstration be attempted by one unfamiliar
with the apparatus. Although the giant brush discharge is may not be felt
shocking to the
average person, a shock from any part of the equipment other than the high-frequency transformer will carry with it serious consequences to the person
involved. It is suggested that when this apparatus is demonstrated before a
group of persons, they be warned not to touch the apparatus and to stand a
respectful distance from the low-voltage equipment.
The apparatus about to be described is capable of throwing a spark four and a
half feet long. In spite of its deadly appearance, this spark is quite
harmless. The operator may hold a metal rod in his hand and let it jump to the
end of the rod and run through his body to ground, not only without harm, but
without any sensation of shock. A rather spectacular stunt is to hold one wire
leading to an incandescent light, and bring the other end near the coil. The
lamp will be lighted by the current passing through the body and may in a few
minutes even be burned out. A mystifying trick is to hold a short length of
neon tube in one's hand, and approach the coil. Long before there is any sign
of a spark jumping to the tube, it will light with its characteristic glow.
Many interesting experiments can be per formed from an insulated platform.
Since the spark jumps to grounded objects, if one stands on a board supported
by glass insulators (milk bottles will do temporarily) and touches the
discharge ball with a metal rod, sparks may be drawn from one's body by anyone
standing on the ground. Care must be taken not to draw sparks from the bare
skin, as they might cause a blister. A finger ring, or even a spoon in the
mouth, can be used as good contacts from which to draw the spark. A peculiar
and weird effect can be had, when one is so charged, by raising the free hand
above the head in a darkened room. The person will then be Lightning With Oudm
Coil]
Perhaps the most awe-inspiring spectacle is the coil operating under full power
in a dark room. Long streamers of purple fire dart out in all directions from
the discharge ball dimly seen outlined by a purple discharge. Small flames
will dart from the raised hand, hair, and even from the tips of the ears.
Perhaps the most awe-inspiring spectacle is the coil operating under full power
in a dark room. Long streamers of purple fire dart out in all directions from
the discharge ball emitting at the same time an almost deafening noise. A
grounded wire is now slowly moved towards the discharge ball. The streamers
change their direction and snap at the wire. Suddenly a heavy spark bridges the
gap, and the air becomes thick with ozone.
Many experiments can be performed with this apparatus, and this short sketch
gives an idea of some of them.
Before beginning the actual construction of the device, it is well to know
something of the principle involved. Briefly, it is this; as the frequency
of an alternating, high voltage current rises, it loses many of its normal
characteristics. At extremely high frequencies it is almost a totally
different kind of electricity. It produces no sensation of the shock when
taken through the body, • because as the frequency becomes higher, the path of
travel becomes closer to the surface. At extremely high frequencies this path of
travel is so close to the surface that it does not -touch the nerves. This is
known as "skin affect," It has a tendency to diffuse off the conductor into the
air, causing the beautiful brush discharges often seen on insulated wires. This
also accounts for the lighting of neon tubes without wire connection. The
current refuses to be stopped by nearly all insulators, oil being one of the few
insulators having some protective qualities.
In order to produce a current of this nature, four distinct pieces of apparatus
are necessary. They are: a low-frequency transformer which converts the low
voltage current from the lighting circuit into high voltage current suitable for
charging the condenser; a condenser which is composed of alternate sheets of
metal and glass; a spark gap which consists of two electrodes separated by air;
and a high frequency transformer.
The low frequency transformer should have an output of 3,000 to 5,000 volts.
The transformer is of the magnetic leakage type such as used for radio purposes^
Since the construction of a transformer of this size embodies considerable
difficulties, the reader should, if possible, obtain one already constructed.
A power line transformer may be converted into one of the magnetic leakage type
at little trouble or expense. A small transformer, such as is put on poles to
step down current from 5,000 volts to 110 or 220, can undoubtedly be purchased
from "an electrical junk-yard or direct from the local power company at a very
reasonable cost. The power drawn by the unaltered transformer probably will be
too large, but this need cause no worry as it may be reduced by the choke about
to be described.
The choke consists of 510 turns of No. 10 D. C. C. copper magnet wire. This
coil is wound in four layers on a Bakelite tube 16 inches long and two inches in
diameter. To wind the coil, lightly force two square blocks into the ends of the
tube and mount it in a lathe. In the absence of a lathe one can easily
construct a coil winder to be turned by hand or a foot treadle. Shellac the
tube and cover it with a layer of waxed paper. Then begin winding (he coil
54-inch from the end of the tube to the other end, leaving the same margin.
After completing the first winding, cover the layer with six sheets of waxed
paper and wind back to the starting end. Solder a tap of wire to the last turn
of this layer, cover as before with waxed paper, and wind another layer.
This layer also should be tapped and insulated with waxed paper. The last layer
is wound to within 1 inch of the end and the wire anchored to the coil with
friction tape. The completed coil is now covered with ten sheets of -waxed
paper and liberally soaked
The tube to contain the core should be small enough to slip in and out of the
coil easily. It is packed with soft iron wire of No. 20 gauge and the ends
trimmed to make a smooth job. About ten pounds will be needed for the core. By
using the taps to vary the number of turns and by sliding the core back and
forth in the coil, the value of reactance is readily changed. It the reactance
is not sufficient to prevent "blowing" of fuses, wind another layer of No. 14
wire on the coil. The reactance coil is connected in series with the primary
of the low frequency transformer, as shown in the diagram.
The purpose of the condenser is to store the high voltage current momentarily.
When sufficient energy charge is stored it discharges across the spark gap.
While this discharge may seem to be only one continuous spark, it is in reality
thousands of discharges first in one direction and then in the other. No
sooner does the potential fall to a low value than the condenser is recharged,
starting the cycle of operations all over again. By this process the
frequency is raised to the required point.
The condenser is made from glass plates, sheets of tin foil and copper
ribbon for tab connections. The glass plates can be bought from a
photographer already cut 8x10 inches and are preferable to window glass because
they are free from bubbles and other imperfections. To clean them they should
be soaked in hot water and then scoured to remove the emulsion.
To make the condenser, 132 plates will be required. It might be well to have a
few extra in case some are broken or prove defective. Sixty of the cleaned
plates are now covered in the center on both sides with heavy tin foil cut 6x8
inches. This tin foil may be purchased from .wholesale hardware dealers in
rolls a foot wide. As is readily seen, 40 feet will be needed. If it cannot be
obtained in this form, a florist might be able to supply it in sheets. To fix
the tin foil in place, the plates are heated in an oven, rubbed with a cake of
beeswax, and the tin-foil sheet pressed on the center so as to leave a margin of
one inch on each edge. Both sides of the plates are covered in this manner. Any
ridges or wrinkles in the foil should be pressed out by rubbing gently from the
center with a wad of cloth. Copper strips % of an inch wide and three inches
long are soldered to the upper left hand comer of each sheet of tin-foil after
which the condenser is ready for assembling.
First a plate without tin foil. is taken, then a plate prepared with the foil is
placed on top of it, then another clean one is placed on top of (he prepared
plate. These plates are stacked together until five of the prepared plates have
been used. A clean plate is then placed on top of the pile to act as a cover.
The unit is then bound with friction tape to prevent the plates from separating
during the insulating process. When all the plates have been used there will be
12 units ready for insulating. The first method of insulating is perhaps the
best if it be not desirable to move the condenser very much. It consists of
submerging the entire condenser in a tank of transformer oil. If this is done be
sure that the wires from the individual units are above the surface of the
liquid. The other method of insulating consists of dipping the edges of each
unit to a depth of two inches in a hot mixture consisting of equal weights of
beeswax and rosin. We now come to the construction of the spark gap. This
consists essentially of a fan motor turning a copper or steel disc, slotted
as shown on page 94. The discharge electrodes are placed on either side
of this disc so that when it revolves new faces are constantly being presented
to the spark. This not only keeps the metal from oxidizing but constantly
circulates a current of fresh cool air between the electrodes.
The motor for this gap may be of any convenient size. An old fan motor is best
as it uses little current and has a fairly high operating speed. The rotating
disc should be at least %-inch thick and 10 inches square. After finding the
center of the piece of metal, a circle of 10 inch diameter is drawn, then one
of 9 inches and finally one of 3-inch diameter. The metal plate is next
mounted on a wooden faceplate in the lathe and a cut taken through the metal on
the 3-inch circle and a similar cut taken on the 10-inch circle. The disc
should now be divided with 24 radial lines running from the center and crossing
the edge at 24 equidistant points. Since the radius of a, circle is equal to
1/6 the circumference, the 9-inch circle/can easily be divided into six parts
with a compass, each of these parts cut in half and then each part once more
halved making 24 equal parts. Alternate segments between the 9-inch circle and
the edge are removed. This is best done by cutting the two edges down as ,far
as the circle and then breaking off the fragment. This is entirely permissible
since the bottom of the cut does not have to be smooth.
To insulate the motor from the high tension current, the disc is mounted on an
insulating hub, which in turn is fastened to the motor shaft. The disc is
placed on the fiber and six holes drilled around the edge of the fiber and on
through the metal. The two are then bolted or riveted together.
The motor with the completed rotating disc mounted on the shaft should be
bolted to a suitable base. Opposite the edges of the disc screw a piece of
fiber '4-inch thick, 1-i-nch wide and high enough to extend an inch above
the motor shaft. These form the supports for the stationary electrodes. The
electrodes are made of brass and ground or filed slightly concave to fit the
curve of the disc. The side opposite the concave face of each electrode is
drilled and threaded upon a 5/16 -inch brass rod which in turn passes through
y& -inch holes drilled in the fiber supports in such a position that the
electrodes are nearly level with the motor shaft. Strips of heavy copper
ribbon are soldered to . the brass rods and establish connection with binding
posts placed a few inches beneath the rods on the fiber supports.
We now come to the final piece of apparatus and perhaps the most difficult to
construct, the high frequency transformer. This transformer consists
essentially of a large cylinder upon which wire is wound in a single layer for
the secondary coil with a flat spiral of copper or brass ribbon about the base
to act as the primary. Because it deals with high frequency electricity,
no metal core is. necessary. The cylinder for the secondary is 53 inches
high and 15 inches in diameter. It is constructed without the use of nails
throughout for nails will cause considerable loss in current due to brush
leakage. The cylinder is formed on three plywood discs 14 1/2 inches in
diameter from mounting board or strips of wood 1/2-inch wide, 1/4-inch thick
and 53 inches long. The strips are placed side by side and as close together
as possible. When the entire circumference has been covered you should have a
solid, well constructed, wooden cylinder. It should now be shellacked and
covered with a layer of wrapping paper. This serves to remove the rough edges
left by the strips.
The winding on the secondary consists of 700 turns of No. 22 D. C. C. copper
magnet wire, with the turns spaced 14 to the inch. This will amount to about
2,670 feet or 5.2 pounds of wire. To wind the coil pass a metal rod through
the cylinder and mount it between two saw-horses. Before winding the wire on
the cylinder, glue a band of one inch copper ribbon around the cylinder, one
inch from the top and another placed three inches from the bottom. The bands
should not meet, a space of about one inch being left between ends. Solder one
end of the wire to the top band and start winding. The . spacing between turns
maybe obtained by winding heavy cord alongside of the wire. Shellac liberally
applied will hold the turns in place.
The discharge ball is of metal and about 5 inches in diameter, mounted on top
of the coil. A toilet tank float will serve the purpose very well. Complete
the secondary coil by connecting a wire between the metal ball and. the top
of the coil.
The primary coil is wound with copper or brass ribbon1 1/2 inches wide in the
form of a flat spiral. About 53 feet of the ribbon for the 21-inch outer
diameter of the 10-turn spiral winding will be required. The primary
supports consist of 8 pieces of fiber 8 1/2 inches long, 2 inches wide
and 1 inch thick. The four top pieces have a section cut away as in the drawing
so as to keep the coil from spreading. Holes are drilled in these pieces, 3/8
of an inch from the ends, large enough to permit the passage of six inch
bolts.
The primary coil is mounted on a wooden base 37 inches in diameter with the four
fiber pieces to support the primary located so that the primary will be in the
center of the board. The supports are then bolted to the base, thus holding the
primary securely in place.
Mount the secondary inside the primary coil on a wooden base 16 inches square,
supported on four wooden blocks. Place the blocks so they rest flush with the
edges at the corners of the board, and drill holes for a good sized bolt to pass
through each corner of the board for mounting the secondary coil to the base.
A piece of copper ribbon is soldered to the inside turn of the primary coil,
and to the bottom of the secondary, winding, completing the coil
construction.
The apparatus is now ready for connecting and operating. The wires are connected
according to the diagram. For the sake of simplicity the rotating disc is
omitted in the diagram of the spark gap. The spark gap motor is of course
connected to the input line through a suitable switch. The wire from the
secondary of the low frequency transformer, is automotive high tension wire;
that from the condenser should be special, heavily, insulated neon sign
cable, as should that also from the spark gap. GREAT CARE MUST BE TAKEN
NEVER TO TOUCH THE LOW FREQUENCY TRANSFORMER. The condenser when charged will
retain a considerable quantity of electricity for days, so it is well to
"short" the connections for a second (with a well insulated metal rod) before
touching them. The grounded connections may be of braided ribbon or other
heavy uninsulated wire connected to a water pipe. This ground should be a water
pipe, never a gas pipe. Under no circumstances should the coil be operated
unless this ground is established.
The coil is now ready to be set in operation. Clip the wires from the condenser
and the spark gap to convenient turns of the primary of the high frequency
transformer, start the spark gap motor, and turn on the power. A loud crackling
noise should be heard and streamers of fire seen darting from the discharge
ball. Vary the number and position of the turns used in the primary of the high
frequency transformer and perhaps alter the capacity of the condenser until
maximum output is obtained. Be sure that all power is shut off when these
adjustments are made, and discharge the condensers as mentioned above before
touching anything metallic
| Below are some
pictures of a home built Oudin /Tesla coil. This instrument uses
a neon sign transformer supply. |
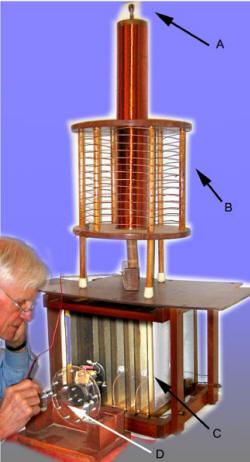 |

Above Interrupter
To the left
A secondary coil
B primary coil
C Tuning Condensers
D Rotary Spark Gap
|
|

|

Putting the final touches on a
bigger
Tesla coil |

A number of sources of electric
energy see if you can find them ;
1, electrostatic
2, electrical chemical
3, electromechanical
Devices for
managing electric energy;
1, low frequency magnetic core transformer
2, high freagency resonance air core transformer |
|

Times have changed!
The photo from the Mag.
article on this web sight shows the
young man holding the wand and collecting the lighting discharges. The
young lady on the other hand is sitting in awe looking up as it all happen.
(Note the young lady
has her near knees much to close to the dangerous part of the coil.)
Today the young lady is waving the wand and
teasing the electric lion while the "young man" is nervously enjoying the
spectacle.
DISCLAIMER; The author assumes no
liability for any incidental, consequential or other liability from the
use of this information. All risks and damages, incidental or otherwise,
arising from the use or misuse of the information contained herein are
entirely the responsibility of the user.
| 


